Please don’t publish this in any form
without written permission from Juliet Page. It is given here
strictly for your own use and enjoyment.
Materials:
4 x 4 x 6’ Post
2 x 4 x 4’ Wood “Stud”
3/8 x 6 Bolt w/ washers and nut
3/8” x 12” Drill Bit
1 1/2” Forstner Drill Bit
3/8” Wooden Dowels (36” Long, 16 Req’d)
Instructions:
1. Using a table saw set to 45 degrees, cut the
four corners off of the 4 x 4 post to get an octagonal post with
8 equal length sides.
2. Drill a 3/8” hole in the center of the
base of the post at least 5” deep.
3. Drill a 1 1/2” hole in one of the eight
sides of the post with it’s center 3” above the bottom
of the post where you drilled the 3/8” hole.
4. Starting 12” above the base of the post,
drill 3/8” holes about 1” deep angled so that the hole
will be inclined at 45 degrees to the post, with the top of the
hole leaning away from the base where you drilled the 1 1/2”
hole. These are for the “branches.”
5. Repeat #4 every 12” along the side of
the post.
6. Repeat #4 and #5 for the other three sides of
the post, every 90 degrees apart.
7. Repeat #4, #5 and #6 for the other four sides
of the post, but start the first hole 18” above the base of
the post.
8. Cut the 2 x 4 into two lengths 24” each.
9. Cut a half-lap joint in the center of the two
2 x 4 pieces. For a half lap joint, cut a notch 1 1/2” wide,
half of the depth of the 2 x 4 (1 3/4”). Flip one of the 2 x
4’s over, and assemble in an “X” with the two cut
notches interlocking.
10. If desired, you can “round” the
top corner of each end of the 2 x 4 pieces as shown in the
attached drawing. Be sure to note which corner is “UP”
on each piece.
11. Glue the two 2 x 4 pieces together using
wood glue and let dry.
12. Drill a 1 1/2” hole about 1/2”
deep from the “bottom” (ie. not rounded) side of the
two 2 x 4 pieces at the center of the “X” formed by the
half-lap joint.
13. Drill a 3/8” hole completely through
the two 2 x 4 pieces at the center of the “X”.
14. Insert the 3/8” bolt through the 2 x 4
base pieces from the bottom side (so the head of the bolt is in
the recess formed by the 1 1/2” drilled hole. Be sure to
place a washer under the head of the bolt before inserting in the
base boards.
15. Slide the 4 x 4 post over the bolt. While
lowering the 4 x 4, insert a washer and the nut onto the 3/8”
bolt through the hole provided by the 1 1/2” hole in the
side of the post. Tighten the nut securely.
16. Cut the 3/8” dowel into 12”
lengths.
17. Insert (don’t glue, so you can remove
broken pegs) the 3/8” dowels into each of the angled holes
in all eight sides of the 4 x 4 post.
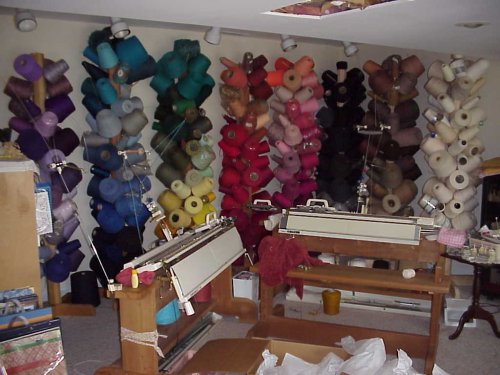
18. Sit down and sort your yarn by color, weight,
species of animal, ... and place one cone onto each of the “pegs”
in the tree. As your yarn forest multiplies, be sure to be
considerate to the native animals (your family) and leave some
room for them.